Friday, December 6, 2013

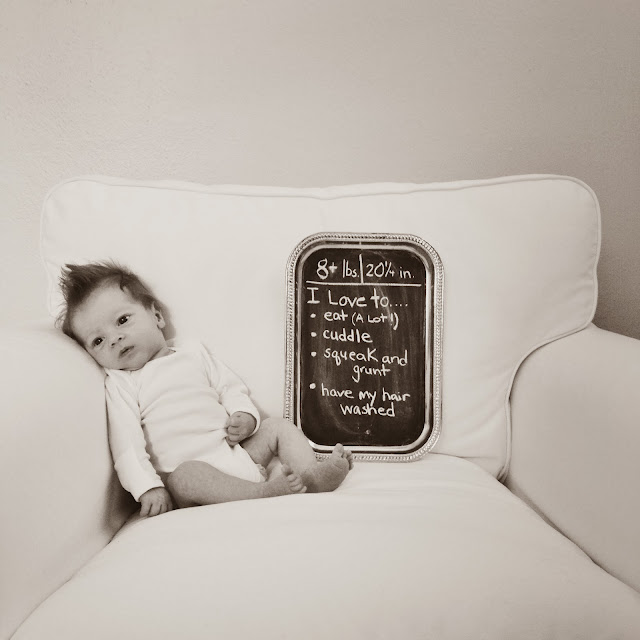
1 month with Baby Jax

People aren't lying when they say how fast time flies with a baby.  I really can't believe an entire month has gone by since Jaxson joined our family.  It has certainly been a life-changing, tiring, and sometimes stressful but overall truly amazing month with our little guy.  We just can't stop staring at him and marveling that he is ours.  He is truly a good gift from the Lord and we fall more in love with him every day.

Here is a little bit of what you have been up to lately, Baby Jax:


  • At your two week appointment you weighed 7lbs 13oz.  You have continued to chub up and we think you are closer to 8.5lbs now.
  • You have outgrown some of your newborn clothes, but some 0-3 months is still too big.  I'm sure it won't be long before you fill those out!
  • You love to eat (a lot!!).
  • You have TONS of light brown hair and dark blue eyes.
  • As far as sleeping at night goes, you have good days and bad days.  More recently you have started to give us a few 5 hour stretches at night.
  • You still sleep in the cradle at night, but have started taking naps during the day in your crib.
  • You are very vocal and like to squeak and grunt.
  • You enjoy being held.  We can pass you around at family gatherings without ever waking you up.
  • Car rides are a guaranteed way to get you to sleep.
  • Your first outing was to the doctor, but since then you have been to church, the grocery store, the mall, a couple restaurants, and your grandparents' houses.
  • You have certainly had a lot of "firsts" this month, but some of the most memorable might be your First Thanksgiving and your first Christmas tree shopping trip.
  • Ever since you were 6 days old you have proved to be super strong, by lifting up your head while laying on Daddy's chest.   You is still a bit wobbly, but definitely getting more control.
  • At 3 weeks daddy laid your tummy on the bed, and you rolled over to your back.  You did it 3 times in a row!
  • You smile a lot during your sleep.  We like to think you are smiling at us.

We love you Jaxson and are so glad God decided to let us be your parents.  We couldn't imagine life without you!  Happy one month baby boy!


Wednesday, October 30, 2013

Plumbing pipe curtain rods

When deciding on curtain rods for Jaxson's room, I just couldn't find anything that really caught my eye.  I knew I wanted something different, but also didn't want to spend a fortune.  This is where Pinterest came in handy (yet again!) and I stumbled across how to make curtain rods out of plumbing pipe fittings.  Drew Babe thought my idea was a little crazy, but he said I could give it a try (he always puts up with all my crazy ideas!....best husband ever!).

I somewhat followed this tutorial with a few modifications.  Everything, except the floor flanges were found in the plumbing section at Home Depot.

Here are the supplies I used:


  • 4- 1/2" floor flanges (I ordered these on Ebay for just over $3 a piece.  This was tons better than paying $9.95 per piece at Home Depot or Lowe's.)
  • 4- 1/2" x 3 1/2" nipples
  • 4- 1/2" 90 degree elbows
  • 1- 1/2" 10 ft long galvanized pipe (Home Depot cut it in half for me for free.)
  • 4 packs of curtain ring clips
This is definitely a two person job, because after all the pieces are together, the curtain rod is quite heavy.  


We put the entire rod together, along with the curtain ring clips, and then mounted it on the wall.  Because Drew is much more of a perfectionist than I am, he did all the measuring and leveling.  I think Drew used anchors with the screws, just to make sure there wasn't any chance of the rod falling out of the wall.


We like to hang our curtains and blinds "high and wide."  It definitely gives the illusion of a much larger window and taller ceilings.


The last time we went on our annual Ikea trip, we purchased these simple white curtains for the nursery.  After the rod was installed, we simply had to clip on the curtains.

This was definitely one of the easier projects (thank goodness!...if only every DIY home project could go exactly as planned) in the nursery, and we love the modern-industrial look of the curtain rod.


Wednesday, October 23, 2013

DIY chalk paint

I first heard of chalk paint while visiting my extended family in Memphis, TN, where it has become a very popular design trend.  After learning more about this new-to-me painting technique, I learned it was perfect for me (a somewhat lazy DIY-er, who doesn't like to spend a long time on projects).  The whole concept behind chalk paint is, it's easy to work with, requires minimal prep work, and looks amazing when you are finished.

As we were putting together the nursery, we decided the rocking chair needed a little side table.  We debated buying a brand new table, but just didn't want to spend more money.  My mom recently got a beautiful new bedroom furniture suite, and I thought one of her old nightstands might be just the thing for our side table.

Of course, the 80's Queen Anne style didn't quite fit into our fresh and somewhat-modern nursery.


I decided to give chalk paint a try.  Instead of buying the more expensive Annie Sloan Chalk Paint, I simply researched Pinterest and the internet for recipes on how to make my own.  We already had the paint from the stripes on Jaxson's wall.

Here is the recipe I used from this blog:
1/2 cup warm water
1/2 cup plaster of paris (I just used some that I found in the craft section at Walmart- $4/box)
Mix together until dissolved.
Add 1 cup of paint

I know it doesn't seem like a lot, but the chalk paint covers so well it goes a LONG way.

No stripping.  No sanding.  Pretty much no prep work.  I just got right to work, and here is what it looked like after one coat.


The first coat looked very streaky, but the second coat filled everything in.


I ended up doing 4 coats, just to be sure everything was well covered.  After the piece dried for a couple hours, I started sanding off the grit and distressing the edges a bit.  If I wanted some of the dark wood to show through, I simply sanded a little bit more in that area.  This is where you can really make the piece your own by deciding on how much distressing you want to do.

To cure everything, I applied one layer of Minwax Paste Finishing Wax.  I put a very small amount on a soft, lint-free cloth and buffed it over the entire piece.


Once I finished the table, we picked out some new hardware to replace the old, flashy, brass drawer pulls.


We went with a brushed nickel pull.  Because of the size and spacing of the holes on the drawer, there were only a few pulls to choose from at Home Depot.  Thankfully we really liked the hardware that would fit the original holes.

Both of us love how the nightstand turned out, and I can't wait to mix up another batch of chalk paint to try on something else!  I really love when things can completely transform in just a few hours of work.


Friday, October 11, 2013

Jaxson's Nursery

Today is your lucky day.

Since I have been lazy about posting regular nursery updates, I am simply going to jump ahead to the grand reveal.  When If I get around to it, I will post more details about the specific projects that went into our little guy's room.

So without further ado, Jaxson's nursery, aka, my new favorite room in our house.


Drew is planning to build a custom wood frame around a mirror to go above the dresser, but that project might have to wait until after Jaxson is born.


I am planning to do a complete source list for everything in his nursery.

Saturday, September 28, 2013

Pottery Barn Kids glider wannabe

When we first started planning the nursery, I knew I wanted to get a fully upholstered glider that we could one day use in another room of our house.  Unfortunately, the only place I found that had what I was looking for was Pottery Barn Kids.  Don't get me wrong, I absolutely love all things Pottery Barn, but I simply couldn't convince Drew Babe that nearly $1000 for a nursery chair was definitely in our budget.

Thankfully Pinterest and Ikea came to my rescue.  We saw other people had turned Ikea chairs into a rocker/glider and thought we would give it a try.

If we had an unlimited supply of funds, I simply would have purchased this chair from PB.


But we don't, so we picked up this chair during one of our yearly Ikea visits.  (I know a lot of people have used the Jennylund chair for a project like this, but we liked how the Ektorp felt more roomy and comfortable.)


Some of you may be thinking white is a risky color for a piece of furniture, but the fantastic thing is I can always wash it or simply buy a new one if it starts looking dingy.  I also used Scotchguard on the entire slipcover to hopefully somewhat protect it from spills, spit-up, blow-outs, etc.

I tried to show Drew Babe some of my pins on how people turned their Ikea chair into a rocker/glider.  His wheels immediately started turning, and he figured out how he was going to do this project without following a tutorial.

We purchased the rocker mechanism off Amazon.  I believe the only other things Drew needed for this project was a piece of plywood, some 2x4s, and a few screws.  We kept the legs off of the chair, and Drew screwed in a piece of plywood for the rocking mechanism to rest on.


Because we wanted it to be a tad higher and not have the slipcover skirt dragging on the floor, Drew added 2x4s.  The rocker mechanism was then installed.


Now, for a fraction of the cost, we have our own fully upholstered nursery glider.


Here is just a little comparison for you:

Pottery Barn glider:
$849 (on sale)
+$80 delivery surcharge
__________________
Total $929

Our Ikea chair turned glider:
$249 chair and slipcover
+$49.99 rocker mechanism
__________________
Total $298.99

(Drew already had the wood and hardware in the garage, so that wasn't an extra expense for this project)

Our nursery chair has already gotten lots of use, and is very comfy and sturdy.  The nursery is definitely coming along.


  • re-paint all trim
  • paint the stripes
  • paint bedroom door and closet doors
  • install new outlets and covers
  • put together furniture (we will have the crib complete tomorrow)
  • install blinds
  • install curtain rods and hang curtains
  • add some artwork to the walls
  • re-do the entire closet
  • decorate and organize


Wednesday, September 18, 2013

Another check in the box

I hope by the time we are finished with "project nursery" you will not be completely bored of it.  There have just been a lot of little steps to complete and we are steadily working at each one.  This week Drew completed all of the electrical work in the room.  This included replacing all of the yellowish outlets and outlet covers with crisp white ones, and installing a new light fixture for our little boy.

I had been looking for a ceiling light fixture for a while and, of course, everything I liked was over $100 - way more than we wanted to spend.  During one random trip into Lowe's, I decided to check out the light section and spotted this guy on clearance for $35! (marked down from $90).


I love it, and I think Jaxson will too.  Drew says the circles on the side look like baseballs, so that makes it perfect for a little boy's room.  I went with a semi-flushmount light.  It hangs down a bit from the ceiling, but we won't have to worry about hitting our head on it every time we go in the room.


Drew Babe also replaced all the outlets and outlet cover.


Much more crisp and clean, as opposed to the dingy bisque colored ones.


After a bit of cleaning, the room now looks like this.


Our next steps are the blinds and curtains rods.  I discovered a very unique curtain rod idea on Pinterest, so I am very eager to see how it turns out. Putting together the furniture might even happen this weekend too.

  • re-paint all trim
  • paint the stripes
  • paint bedroom door and closet doors
  • install new outlets and covers
  • put together the furniture
  • install blinds
  • install curtain rods and hang curtains
  • add some artwork to the walls
  • re-do entire closet
  • decorate and organize

Monday, September 16, 2013

We have the stripes

That title almost makes it sound like we caught a case of something bad, but actually this is a good thing- a really good thing.  Slowly but surely we are making more progress in our little boy's nursery, and this is something I am particularly excited about.  

This past weekend, in lieu of our regular date-night-out, we picked up our favorite YNot pizza and had a stripe painting "date" at home.  We decided to paint some horizontal stripes on the crib wall, as an accent.  Instead of choosing on just one color for the stripes, we decided on three colors for a little different look.  Picking the colors was one of the most challenging parts, because we still wanted them to somewhat coordinate with the others.  

In our original rendering of the accent wall, Drew made sure that I wasn't planning on using purple in our son's room.  I assured him I was not, and that was the only crayon color choice that I could find at the time.


We changed the stripe placement after measuring everything out on the wall.  The final colors we went with were all satin finish from Benjamin Moore: Vermont Slate, Blue Stream, and Water's Edge.  Since we were only doing stripes on one wall, I was able to just buy the sample size paints.

I put Drew Babe in charge of the measuring and leveling of the stripes, because I know he is much more of a perfectionist than I am.  I do like things to look perfect, but some things I don't bother to take the time.  Thankfully I married someone who will do everything possible to make sure something is straight/level/etc.

 
The Frog Tape held up to its standards and prevented any bleeding, even on our textured wall.


The two colors here are the dark Vermont Slate and the Water's Edge.


After each stripe was complete, we got more and more excited to see the finished product.  The top and bottom stripes had us laughing hysterically while we were painting them.  They seemed to be the same exact color as the rest of the walls, when it was supposed to be a shade darker.  Thankfully after it dried, it was in fact darker than the rest of the walls.


Here is where the room started:


And here it is today:


I think we have officially finished all of the painting portion of the nursery.  There is still much to do, but we are making progress.

  • re-paint all trim
  • paint the stripes
  • paint bedroom door and closet doors
  • install new outlets and covers
  • put together the furniture
  • install blinds
  • install curtain rods and hang curtains
  • add some artwork to the walls
  • re-do entire closet
  • decorate and organize (the fun part!)

Thursday, September 5, 2013

Progress in the nursery

Finally!!  We have finally started in Baby Jaxson's room!  Mimi and Pops (my parents) graciously offered part of their Saturday to help paint the main color in the nursery.  With four of us working in the room and the walls only requiring one coat, we were finished in less than two hours.  That is my kind of house project!  I just wish everything was that easy.

Here are some "before" shots of the nursery with the blah tan walls.  We only taped the windows, because we are planning to repaint all of the white trim.


 And here are some "during" shots with all the wonderful painters.


And finally the "after."  We went with a satin finish Benjamin Moore color called Blue Haze.  I love how it looks with the white trim and dark floors.


You can see where we are testing out some other blue colors.  We are going to eventually add stripes on this wall.


It has been a huge relief to have the main color finished, but there is still much to do.


  • re-paint all trim
  • paint the stripes
  • paint bedroom door and closet doors
  • install new outlet covers
  • put together the furniture
  • install curtain rods and hang curtains
  • add some artwork to the walls

Friday, August 30, 2013

The big 3-0

Little Jaxson has officially turned 30 weeks; 30 weeks in utero, that is.  I really can't believe how close we are getting to his due date.  Every day I thank the Lord for the privilege of carrying this sweet little life.  I thought now would be a good time to share some of my pregnancy details/thoughts/favorite things/least favorite things, etc.


When we found out:  On March 3rd  I woke up super early to take a test.  After seeing a few negative tests, I didn't even want wait for the results on this one.  I let Drew go see whether the test showed positive or negative.  He only saw one line and quietly came back to bed.  I had to go see for myself and noticed a faint second line.  The next test we took showed two distinct lines, meaning positive.  When we saw the heartbeat and our little baby for the first time at our appointment, we were simply overwhelmed at the goodness and faithfulness of the Lord.

Some of the best moments:  At 18 weeks, I felt Baby Jax move for the first time.  Drew got to feel him for the first time about a week later.  Some of my favorite times are when Drew will sing to Jaxson.  He always moves for his daddy.  Sometimes  Drew and I will just stare at my pregnant belly and marvel at Jaxson's kicks and somersaults.  I have also loved when Erin, the little 9 year old I nanny for, will come gently rub my baby bump and sweetly say "hi Jaxson."


Some food cravings/aversions:  During my first trimester I wanted pretty much anything unhealthy.  Vegetables and salads, which I love, were so hard to eat.  Also, fresh garlic was the worst things ever!  I couldn't stand the taste or smell.  Thankfully after my first trimester passed, I was able to eat normal/healthy again.  I haven't had any real cravings, although I was on a "Sonic Limeade with extra lime" kick for a while.

Things I miss:  The Lord has really blessed me with a fairly easy pregnancy, and I have enjoyed almost everything (so far!) about it.  I will have to admit I miss Jersey Mike's Italian subs with light mayo (this has been a nitrate/lunchmeat free pregnancy), wine (I'd love to just sit on our front porch with a refreshing glass of white zinfandel or moscato), and long, hard runs (I tried to keep up my running for a while, but then my big belly just got to be, well, too big.  Now when I try to run, I immediately feel like I have to pee.  I already to have plans to run some races with Baby Jax).  I really don't mind giving up those few little things, because experiencing the growth of this little life has been (and will continue to be!) far greater.

Maternity products I have enjoyed:  WIth my growing belly I have invested in a few pieces of maternity clothes.  I never thought I would wear the full panel kind of pants and shorts, but when I tried my first pair they felt SO comfortable.  Rainbow flip flops have been a lifesaver.  I know they are not really a maternity products, but I wear them almost everyday because they are super comfortable and supportive.  I have also enjoyed MamaMio Tummy Rub.  It smells amazing, never feels greasy, and so far has helped against stretch marks (although I'm sure I have a lot more stretching to do!).


What we are looking forward to:  Definitely meeting our son!  And starting the nursery.  My parents are coming over tomorrow to help paint the first coat.  I will leave you with a little sneak peak of what is going on in there right now, although it's not much.


Tuesday, August 27, 2013

New additions

Baby Jax is not here yet.  We haven't adopted any new pets.  But we have added some new things to our living room.

Between childbirth classes, doctor's appointments, working full time, and trying to find time to eat, sleep, and maintain some kind of order at the Martin House, my blogging has been a bit sporadic.  I did want to show you a little update of the new additions in our living room.  Last year my parents blessed me for my graduation with a beautiful Pottery Barn rug.  I picked out something that looked classic with a touch of modern, so hopefully it will still be in style 10 years from now.


You may have noticed the layout looks a bit different too.  After having a few family gatherings at our home, we noticed there really wasn't much seating available.  During our latest trip to Ikea we picked up two wicker chairs and put them where the loveseat used to be.  The new arrangement added additional seating and feels more open when you walk in the front door.


Don't mind the pile of Ikea boxes in the background.  Those are all for Jaxson's nursery, and I promise we will get started on that sometime soon!


 Here is a better shot of our new Ikea chairs.  For the price, they are actually quite comfortable and sturdy.


Please pardon the subpar pictures.  I am definitely not a photographer (which you probably have already figured out) and recently (for convenience sake) have been using only my iPhone for all my picture taking.