Monday, January 30, 2012

Before you speak: Think

Also, before you rip out pages from a book: look it up on Amazon.  That is exactly the lesson I learned when I was trying to create new wall art for our guest bath.  I already had a couple frames, and thought some tropical/beachy pictures from a vintage book I had, would go perfectly in my bathroom.

Several years ago I picked up this book for free at a local used book store.  I used to love looking over all the vivid pictures of the rich and famous during the 1950s-1970s.

Before I began to rip out pages to frame, I decided to check Amazon for the real value of this book.  Because I got it for free, I was sure it was only worth a couple bucks.  I figured, for that price, the pictures would look much better on my wall than in the book.


I typed in "A Wonderful Time" to the Amazon search box, clicked enter on my keyboard, and then noticed the cheapest used price said $175!  I was shocked to say the least.  Check it out for yourself here.


Thank goodness I saved this book from the "free" box at the book store, and thank goodness I didn't go ripping out pages right away.
No, we aren't planning on selling it any time soon.....unless, of course, we hear of a good great unbelievable offer :)

Friday, January 27, 2012

Feels Like Spring

The weather is just one of the many things I love about good ol' VA.  Even at the end of January we still have days where the temperature is close to 70, and it feels just like May.  This got me thinking about our Spring 2011 outdoor project.  

Our first step in tackling the front yard, was the flower bed.  Before we got a hold of it, the bed consisted of a few measly Azaleas and lots of dirt.  Not very homey or welcoming, to say the least.  We decided to add some sexy curves to the flower bed and extend it.  After finalizing the outline of our new bed, we determined which plants would be the best for the partially shady spot.  

We headed to a local nursery and picked up the following:
  • 1 Japanese Maple Fireglow (this stays small, so we don't have to worry about it taking over our house)
  • 3 Nandina Domestica (they have festive reddish-orange berries in the winter)
  • 2 Hawthorn Indian Princess
  • 3 Euonymus Moonshadow
  • 2 Azalea Amagasa Coral/Orange
  • 12 Liriope Super Blue
  • 3 Gardenia Dwarf (these little guys didn't make it, so we ended up getting three more Azaleas to fill their place)
After traveling home with all of our new babies, we attempted to put our green thumbs to work.  Equipped with shovels, fertilizer, gloves, and a hose we began to place and plant everything in our flower bed.


  We used the Liriope to create a soft border on the edge of our flower bed.  The Maple was placed in it's own little spot, so it could really show off its vibrant leaves (maybe one day we will get a soft light to shine on it at night).  We put the three Nandinas near the window with the Hawthorns and Euonymus  in front of them.  The Azaleas found their spot in front of the porch and in spring they will bring a nice pop of color (hopefully!).


During the planting process, we made sure to tease the roots, dig a properly sized hole, and sprinkle with a little fertilizer to give all the plants a boost.  Thankfully they all survived the summer...well, most of them (had to replace the Gardenias with Azaleas).  We are hoping Spring 2012 will really show off our new garden and everything will pop out.  


We knew after planting and mulching our new flower bed, were were going to have to do something with the front lawn.  See that big brown, bare spot in our lawn??  Well, this past fall we made that our outdoor project.  Drew Babe aerated and planted a brand new lawn using a Fescue seed mix.  After lots and LOTS of watering, we now have a beautiful and lush front lawn.  

All of the pictures above are when the plants were just babies, and we had more dirt and weeds than grass.  Check back in a couple months for all the "after" pictures, which will all be lush, green, and vibrant....fingers crossed!

Psst...We have a new porch idea in the works as well.  Can't wait to say goodbye to that awning which never seems to stay clean no matter how many times Drew Babe power washes it.  So keep an eye out for a new front porch as well! :)

Saturday, January 21, 2012

Daily Double

You have pretty much hit the jackpot with this post, because it is actually 2 posts in 1!  The reason for this is because we didn't take any "after" pictures of our new family room curtains without capturing our newly finished family room accent tables as well....soooo we had to include it all in one :)
(we are still working on being sure to get all the "before" and "after" pictures.  Drew is much better about it than I am.)

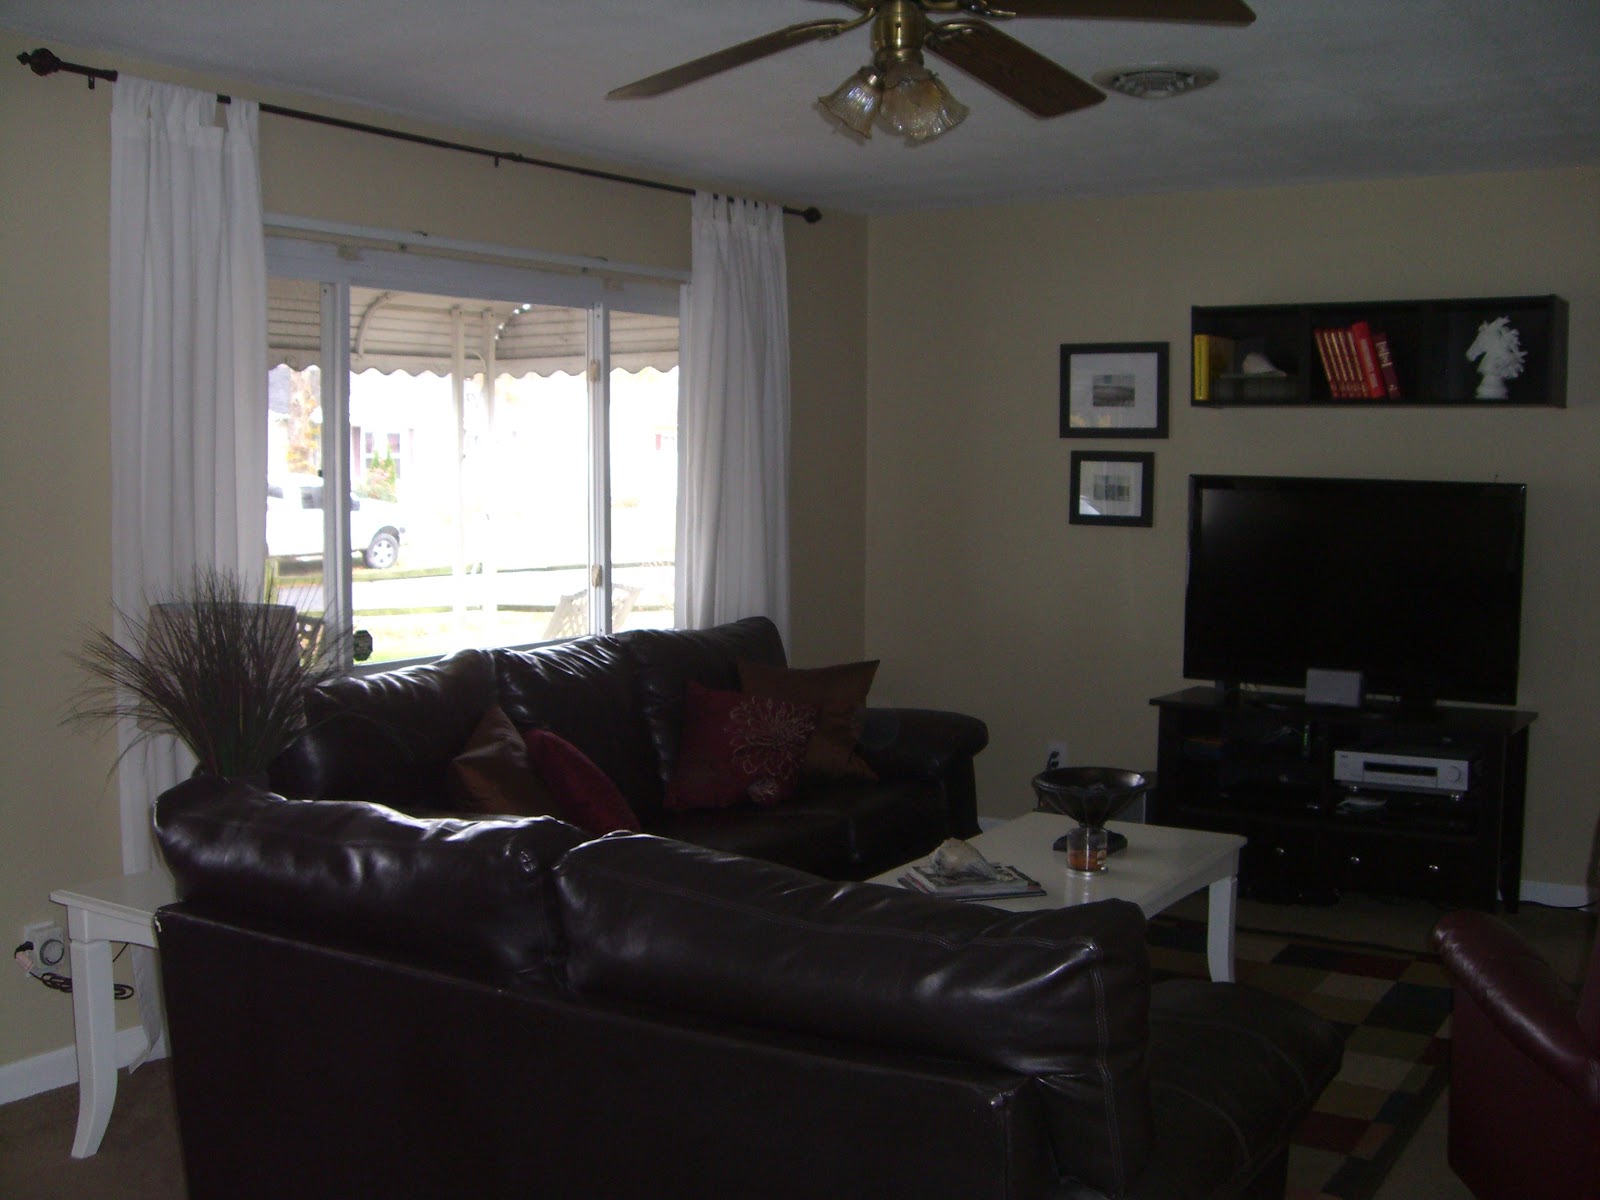
Here is a true before picture of our family room.  No picture frames.  No wall shelf.  No curtains.  Pretty boring and kinda gloomy if you ask me.


(Make sure you notice the wood tables and naked bare window, because they will look completely different by the end of this post)


The loooonng window definitely needed something to make it look more finished.  To bring more white into the room, we decided simple white panel curtains would be the best for this window.

We scored a pair of white curtains for our family room on our Ikea adventure.  We purchased the Lenda style curtains for only $29.99 a pair!  They have a linen like texture and we were able to hem them to the exact length we needed (just skimming the floor) with Ikea's iron-on hem strip.  Super easy and super perfect!

(Please excuse the pillows.  I am normally pretty good about fluffing them:)


To tie in the darker accents in the room, we found an oil rubbed bronze curtain rod at Bed, Bath, & Beyond (where we still had wedding gift cards and coupons).  Drew Babe hung the rod close to the ceiling to make our ceilings appear taller and to lengthen the window.  I usually go with "high and wide" when hanging curtains (this blog has some great tips on hanging curtains).


Often it seems during some of our Martin House projects I am simply the one giving orders directions, and making sure things are straight or even, but with our curtain project I got to iron (and hem) the curtains all by myself.  Here is proof of me trying to be a good wifey:


Now....I have to switch gears a bit.

After purchasing the white curtains, we realized they were going to be the only white item in the family room.  There needed to be something else to tie them in.  We had talked about looking for new coffee and accent tables, but we actually really liked the style of ours, just not the color.  We tossed out the idea of staining them, but then I suggested painting them white to go with the curtains.  At first, Drew was a little unsure about the idea.


We certainly did not want them to stick out like a sore thumb, so we had to be sure to pick the perfect white.  That was no easy task.  After bringing home dozens of whites, looking at them in daylight and artificial light, and comparing them to various other "whites" in our house, we finally settled on Crumb Cookie from Lowe's in a semi-gloss.


We hauled the three tables out to the garage to begin the project.  Our first step was to remove all the legs to make it easier to get good paint cover.


The most tedious task was sanding them down.  To make this step of the project more exciting, we worked on this together (Drew Babe with his pro electric sander and me with my little square of sand paper).  We enjoyed laughing, chatting, and singing (sometimes to spice it up even more, I would break out into spontaneous dancing, and I am no dancer by any means).

To get all the dust off we wiped everything down with a warm damp rag.


On to the primer!  Fortunately we already had a gallon of primer and simply applied 1 (or 2...I can't remember) even coats of the primer.


The primer was super bright white, so we were hoping our Crumb Cookie would not come out looking like that.  We were going for a little bit warmer, but not yellowy, white.

Drew thought it would be a great idea to get a picture of the table with half primer and half Crumb Cookie to really show the color difference.  Fortunately we didn't have to make numerous trips to Lowe's to tweak our paint, because as you can see, the white color came out perfect!


After doing the final coat on all the tables, we let it dry for a day or two.  Drew Babe wanted to give the top of the tables a stronger finish and decided to apply a couple coats of spray enamel.  It turned out really well and they are super easy to clean.

Here is the finished room with the white curtains and the white tables.


 Having the white tables and the white curtains helps to brighten the whole room and make it feel lighter and fresh...if you know what I mean (Drew always says I have the most interesting adjectives when I describe decorating things).


We both love our new brighter and whiter family room.  I may even change up the pillows on the couch sometime to make them pop a bit more.  For a long time I was so afraid to decorate with white, because sometimes it can be so stark.  Now I am finding I love white more and more, and there are definitely ways to make it warm and cozy :)

Thursday, January 19, 2012

The TV Wall

Deciding what to do with the open space around the TV has been a prolonged decorating struggle for me.  First, I thought a large round mirror would look great, but that still left the walls bare on either side of the TV.

While on our Ikea adventure, we found a wall bookshelf for a great price.  The color matched our entertainment stand almost perfectly, so we thought this would help take up some of the wall space around the TV.  Drew Babe soon suggested we also make use of the dozens of gallery frames we received from our wedding registry, but had not made use of yet.  Sounded like a great plan to me!


Here is what the TV wall originally looked like.  Bare.  Boring. And just plain blah.   The first step of redesigning the wall was to get rid of the dust collector ficus tree. 


Drew likes symmetry, so we decided to do two frames on either side of the TV.  We only used four and still have several left over which we could use elsewhere.


Drew installed the Ikea bookshelf and we filled it with some vintage books we already had in the attic.  I love how the colors of the books really pop and bring out the colors we already have in our living room.


See how closely the color matches the stand.  It's like they were made for each other!


Drew Babe is super precise, but it pays off in the end when everything looks even.


And there you have it.  The finished product!  (And a lovely picture of Bruce Willis.  Not sure what movie this is, but bonus points for you if you know:)


We still need to find pictures to put in the frames around the TV.  We were thinking of doing some wedding pictures, because even a whole year later, we still haven't order any wedding prints.  Do you think all black and white, color, or maybe a mix?  Eventually we will replace the monochromatic Target scene in the frames, and somehow find a way to disguise all the cords.  At least the TV wall is a bit more interesting now.

Thursday, January 12, 2012

Brass to Bronze

Instead of spending more $$ and buying a brand new light fixture for the kitchen, we just decided to somehow update our old brass chandelier.  Not even two weeks after our wedding, I had already begun a little revamp on the light fixture by taking off the glass globes for a more modern look.
Through perusing one of my favorite blogs, Young House Love, I came across one of their chandelier makeovers with spray paint (they painted a chandelier here and here).  Now, why in the world did I not think of that quick, inexpensive, and simple idea?!

We purchased a can of our new favorite oil-rubbed bronze spray paint, and began the transformation (we also used this spray paint on our cabinet hardware).  Before going at it, Drew Babe made sure to tape off the places where you screw in the lightbulbs (knowing me, I probably would have never thought of that important little detail, but that's why I married Drew:).


Unfortunately we don't have a starting picture to show the brass and the glass globes, but this is after the first coat of the spray paint.


Here is the finished product after 3 coats of oil rubbed bronze spray paint.  Of course, we let it dry in between coats, and then Drew Babe carefully reinstalled it in the kitchen.


Originally this chandelier had the usual candle-tip lightbulbs.  For the final makeover step on our light fixture, we used small round lightbulbs for a slightly different look.


Well, there it is.  Our updated, from brass to bronze, chandelier.  Ever since our cabinet hardware project, and now this project, I am constantly looking around the house to see what else I can update with spray paint.  Have you ever used spray paint for a house project?  Sometimes I just want a quick and easy fix, and that's exactly what spray paint can do.

Monday, January 9, 2012

Progress in the Kitchen

Even before our wedding, Drew Babe started working on the kitchen.  Originally, the kitchen had faux wood laminate counters,  like in the picture here.  Actually, I shouldn't even say "faux" because that makes it sound chic, and this kitchen started out far from being chic.  I'm sure in the 1970's it looked quite nice, but we are going for a more 2011-ish kinda look.

So, our first step was to rip out the fake wood counters and install (with the help of Uncle Wayne) new laminate counters, just like these.  We also put in a new deeper black sink in place of the old shallow stainless one.  


Because we know the kitchen is everyone's favorite hang out spot, we wanted to make it was open as possible.  Originally, the counter up against the wall (now known as "the peninsula") used to be an island, sticking out into the middle of the kitchen and cutting it in half (unfortunately we forgot to take those before pics...I promise we really are working on that).  When we ripped up the island and turned it to be placed up against the wall, it was a perfect fit!  We did have someone extend the back to make it a few inches deeper, because we can always use more storage space.


To open the kitchen up even more, I asked Drew Babe if we could remove that decorative scroll-y wood piece above the window.  After he ripped that wood piece out, I immediately thought removing the wood shelves on either side of the window would make it look more modern (see why the Martin honey-do list is never ending...poor Drew).  We both loved the new open window!

Next came the daunting and tedious task of painting the cabinets.  We, actually Drew, began by removing all the doors and drawers, so we could more easily sand them down.  We sanded and wiped them clean, and then applied three coats of primer.  For the final coat of paint we went with Sherwin-Williams ProClassic trim and door paint, in a gloss Pure White color.  We had heard horror stories of people trying to cover their wood cabinets with white paint, but thankfully our cabinet project went smoothly, most likely because of Drew Babe's meticulousness and patience.


You might notice the hardware seems different as well.  I found the oil rubbed bronze knobs on Ebay for a little over $1 a piece.  Tons cheaper than the Lowe's or Home Depot price.

The hinges used to be an old brassy color.  Instead of spending well over $100 on new hinges, I suggested we try to paint them.  Drew was a little wary of this idea, because painting a metal contraption with lots of moving parts can be tricky.  We took our time and used our new favorite, (thanks to Young House Love) oil-rubbed bronze Rust-oleum spray paint, to paint all those little jaspers.  They turned out great and even after opening and shutting the cabinets countless times, the paint has stayed the same.


After we removed the scroll-y wood thing from above the window, it left a tiny fluorescent light for all the world to see.  Drew Babe used his electronic tech skills to install a new pendant light above the sink.  At night it gives off such a cozy, homey glow.

The first night of having the light installed, we both couldn't get over the beautiful glow coming from the light.  I bet we stood there for more than a couple minutes just staring at the light and pondering deep thoughts (well, maybe not that last part, but we definitely stared at it).


Drew Babe installed the white shelves above our "peninsula" as a surprise for me.

Still to do:

  • New curtain above the sink.  I already have the fabric, so step one of that project is done!
  • New floors.  Eventually we would like laminate wood floors throughout the kitchen, family room, and hall.
  • New appliances.  The creamy stove really just throws off the crisp and clean look of the cabinets.  We are probably going to go with stainless and have already looked at some.  Still waiting for a great deal.
  • I would also like to paint the wall and slightly different green color.  Less minty and more apple-y.  That may happen way down the road.

Friday, January 6, 2012

City Trips: DC and NYC

 Hopefully it isn't too late to post this because both of these trips were from the end of the 2011, so I suppose they really are old news.  Oh well, at least they will be new to you. 

This past November, my sweet husband suggested we take a weekend trip to northern VA to visit our nation's capital and to make a long anticipated shopping stop into Ikea.  I had been talking his ear off about going to Ikea for the past several months, so of course I thought that was a great suggestion! 

We started our trek to Woodbridge, VA on Friday.  After a delicious lunch at Chipotle, we pulled into the parking garage of the place I had been waiting for all my life, (well, not quite that long) Ikea.  Unfortunately we did not get any pictures of the giiinormousss blue and yellow building, but we did find some great buys that are actually hanging in our family room right now (I will have a more detailed post on that later:).  

After several hours in Ikea (time surely flies when you're having fun), we made our way to a hotel that I had booked to the west of DC.  Because the hotel was outside the city, we got an excellent deal on it...like a dirt cheap deal for a very clean and nicely decorated Marriott in a lovely setting, and it was just a five minute drive to the metro station. 
The view from our hotel room.  I was so glad we were still able to see some of the brilliant colors of the fall leaves.

My Drew Babe and I with our hotel is in the background.

We spent one night in the hotel then got up Saturday morning to make our way to the capital.  This is the drive leaving the Marriott.  Don't you agree it's a beautiful setting?

Our first stop in DC was the Eastern Market.  I have been to DC several times and never ventured here.  We were so thankful to have perfect fall weather to walk through the multiple vendors and outdoor markets.  

He is just SO cute...even while checking his phone ;)

DC metro: the fastest and easiest way to maneuver through the city.

I think Drew Babe is pretty proud of this picture.

Definitely a perfect day to walk all over DC.
The Library of Congress.  All I could think about while walking through here was National Treasure.


After getting lost, doing a few u-turns, and asking a couple people, we finally found quaint Georgetown.  There is not a metro stop in Georgetown, so it is a little harder to get to by foot.  While there, we saw Georgetown Cupcake from the TLC show DC Cupcakes.  I don't know why, but I always make a big deal out of anything I see in real life, that I have previously seen on TV.  As you can see, I'm not the only one who thought this cupcake shop was a big deal.  Although I am sure their cupcakes are divine, Drew Babe and I opted out of taking time to stand in the long line.  

Love him :)

We decided to visit the monuments (Washington, WWII, Lincoln) at sunset/night.  That turned out to be a  good idea because everything gave off a beautiful creamy glow.  


Now off to NYC!  
You may have read in the Christmas post that Drew Babe surprised me with a trip to NYC as part of my Christmas gift.  It has been at lease a ten year long dream of mine to visit the Big Apple during the Christmas season, and when I found out on Christmas day that Drew Babe was going to make my dreams come true, I cried.  Goodness gracious, I never used to be a crier.  I just don't know what happened. 

Anyways, I was super excited to be going to the city with my Drew Babe.  Like I said before, when I see things in real life that I have seen on TV or in movies it makes me happy, and NYC has a lot of those types of things (Times Square, Rockefeller Center, Central Park, the Statue of Liberty, and so on and so on).  I kept envisioning Miracle on 34th Street, Home Alone 2, and Elf.  

We left a couple days after Christmas.  My Aunt and Uncle who live in New York graciously let us stay at the home and helped us map out our adventures in the city.  Our first stop was central park.

They had lots of these cute carriages throughout the park, all decorated differently.

My Aunt and Uncle told us the cart food in New York is usually some of the best.  Surprisingly, we were able to find an organic cart.  Drew Babe ordered an organic hotdog with organic chili.  I had a bite, as I usually do of all his meals, and it really was yummy,

The ice skating rink in Central Park.

I don't think I have heard of this store before, but it had some very exquisite and detailed window displays.  They all incorporated fashion with animals in the theme entitled "Carnival of the Animals."  

"Breaking the Ice" scene.

Rockefeller Center Christmas tree.  It was quite chilly when we were in the city, but I loved having a good and actually necessary excuse to wear a scarf, a long coat, and my Ugg boots.  I really have a thing for coats and winter accessories.

Times Square

I am not sure if we would really go to NYC again right after Christmas and so close to New Years Eve.  It seemed as if everyone and their brother was in Times Square.  In some places it was hard to walk and we even had to cut through stores to get around crowds.  I'm glad I have a tall and strong husband who's hand I can hold while going through crowds, because my southern gentility would definitely not help out at all.

We ate lunch in Little Italy.  The restaurant was probably around the same size as a usual bedroom.  Maybe 10-12 tables at most.  It was so quaint and SO delicious.  Drew Babe said it was some of the best chicken parm (his favorite dish) he has ever had.  

Mulberry Street in Little Italy is lined with dozens of Italian restaurants.

In some of the subway stations and even on one of the subways there were various musicians.  They were playing everything from a guitar to an accordion, and even a stringed instrument that I have never seen before.  
Our last meal in Queens at a neighborhood irish pub.  Best french fries (according to me) and best burger (according to Drew Babe) ever! 
Leaving the city with the view from the Queensboro bridge. 
Drew Babe and I loved our time together in the big city and are so grateful to my Aunt and Uncle for opening up their home to us while we were there.  Our trip was definitely packed full of seeing all the well-known sites and tasting various kinds of food (fyi the best hot chocolate is the Italian thick hot chocolate at Chocolate by the Bald Man in Union Square, and the six dollars-a-pop price is totally worth it).

NYC with my Drew Babe was truly a wonderful surprise to end 2011.